Nearly 100% of Blue Yonder WMS implementations involve some form of custom label development. Label design tools, such as LabelZoom, make the process of designing custom barcode labels much simpler than writing printer code by hand.
But once you’ve built and tested your custom label, how do you integrate it with Blue Yonder WMS? We’ll teach you how in the tutorial below.
This guide assumes you are using the “traditional” method of integrating labels with your WMS, which means the dynamic label template is exported from the label design tool and converted to a static printer code file.
In the Blue Yonder realm, these static printer code files are called “Printer Object Files” and bear an extension of .POF. Inside a POF file, you’ll find one several printer data streams, such as Zebra ZPL or Intermec IPL (now owned by Honeywell). The files are encoded using a special dialect so that Blue Yonder can fill the label with live data from the WMS when printing is triggered.
Step 1: Configure the label search path
This first step is optional, but it only needs to be performed once per environment and helps keep your custom labels organized. Open Policy Maintenance and navigate to Labels > Paths Configuration > Search Path (if you’re unable to find this option, switch to the Policy Data tab and navigate to SYSTEM-INFORMATION > REPORTS > REPORTS-PATH). Add a new entry for $LESDIR/labels (or $LESDIR\labels if your WMS is running on Windows).
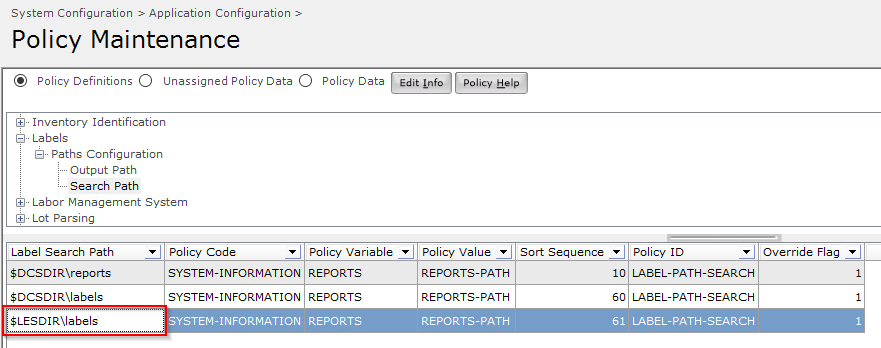
After creating the policy, you’ll need to restart the MOCA server in order for the changes to take effect, as this policy is cached.
Intermission: Understanding the label directory structure
Blue Yonder WMS is designed to be compatible with multiple printer manufacturers. Furthermore, the same WMS instance–whether it’s constrained to a single building or spans multiple facilities–can be configured to print to multiple printer types.
To achieve this, Blue Yonder includes a “Printer Type” field in the printer configuration screens that is used to determine which directory to search for the POF file during a print operation. The printer types are defined in the Code Maintenance screen using the column name of prttyp. The value of prttyp is what determines which subdirectory the WMS will search for a matching POF file.
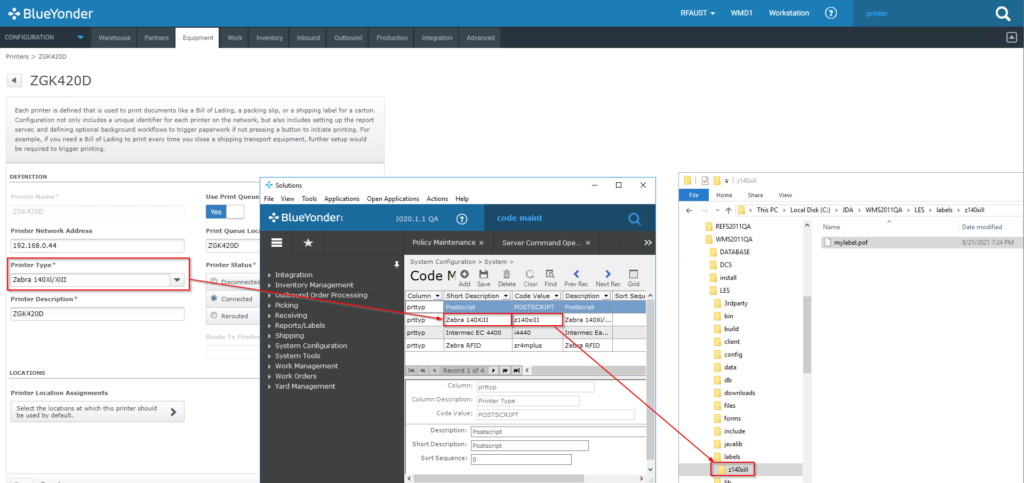
In the example above, we have a printer called “ZGK420D”. This printer has a type of “Zebra 140XiII”. The code value of this printer type is “z140xiII”. Therefore, whenever we print a label to “ZGK420D“, the WMS will scan the z140xiII subdirectory–if it exists–in all of the directories in our search path (see Step 1) when it attempts to locate the POF file.
Step 2: Deploy the label to your WMS filesystem
Ideally this would be accomplished by building a rollout and installing it on your WMS environment, but we’re not here to discuss best practices of change management or SDLC. We’ll simply explain the result you need to achieve, and allow you to fill in the blanks.
The POF file you exported from your label design tool must now be deployed to the filesystem of your WMS application server. It should be deployed to a subdirectory of one of the directories in your label search path. For more information on label search paths, see Step 1. For more information on subdirectories, see the intermission between Step 1 & Step 2.
In our case, we’ve created a POF file that contains Zebra ZPL code, and we’ll be printing it with printers that are configured with a printer type of z140xiII. Therefore, we’ll be deploying our POF file to $LESDIR/labels/z140xiII.
Step 3: Configure the label in the WMS
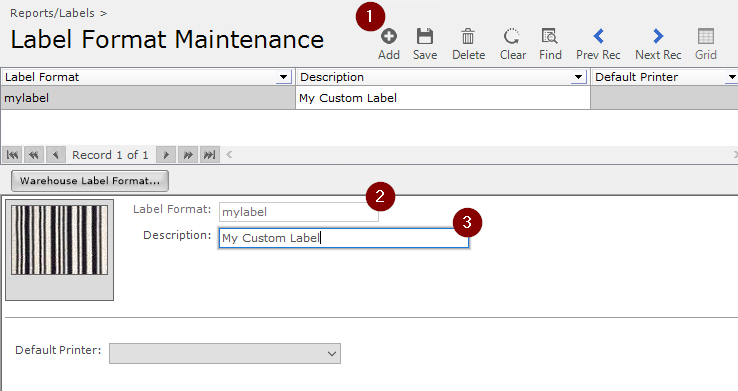
Now that the POF file has been deployed to your WMS filesystem, we need to configure the Label Format. To do this, open Label Format Maintenance and click the “Add” button.
The description of your label can be whatever makes sense to your business. The Label Format, or label ID, on the other hand, must match the filename of your POF file (not including the extension). So if your label is called mylabel.POF, you’d create a new label format called mylabel:
Step 4: Print!
Now that your label is deployed and configured, you should be able to find it in the Print Label Operations screen and generate a test print. There are some additional steps, however, that may improve your experience:
- Want to do parameterized label prints (or reprints)? You’ll need to create a new document type in Document Type Maintenance and define the arguments
- Want to configure automated label printing based on customer/order information? You’ll need to do some additional configuration in Compliant Configuration Maintenance (we’ll be covering this in a future blog)
Epilogue: Data retrieval commands
Labels in Blue Yonder WMS follow a “pull”-style design pattern. When a label print is triggered, the label is provided with a collection of arguments/parameters, and the label “pulls” the necessary data from the WMS.
If using the traditional deployment method outlined above, you’ll need to embed a special, hidden field inside the label that defines the name of the retrieval command. The syntax of this hidden field is as follows:
CMD=name of moca command: This is the simplest option and will instruct the WMS to call a MOCA command called “name of moca command”. Obviously, you’ll need to deploy, compile, and bounce before the MOCA command will become active.CMD_FILE=name_of_msql.msql: This option adds a little flexibility by allowing you to update the retrieval command without bouncing the MOCA server. However, you’ll need to deploy an additional file calledname_of_msql.msqlto one of your label search path directories. It needs to be placed at the root of the label search path, not in one of the printer-specific subdirectories (e.g.$LESDIR/labels/name_of_msql.msql)
Is your head spinning?
Ours, too. This is why we created LabelZoom Engine, which dramatically simplifies the process of deploying labels to Blue Yonder WMS. Let us know if you’d like us to give you a tour of the Engine and show you how it saves time and headaches. Also, we’d be happy to answer any questions you may have about the tutorial above without trying to push our own products onto you, and that’s a promise. Don’t hesitate to reach out!